This will be a quick post showing how you can connect an Azure DevOps Release Pipeline to an Azure Service Fabric cluster. It will assume you already have a cluster created and an Azure DevOps account.
Cluster Certificate Thumbprint
The first thing we need to do is get the cluster’s service certificate thumbprint. You can find this in the Azure portal by selecting the Security Settings in your Service Fabric cluster.

Client Certificate
Next, we’ll need our own certificate that the pipeline will use to connect to the cluster. This is easy to create with some powershell commands.
$clusterName = "my-cluster-name.centralus.cloudapp.azure.com"
$certificate = New-SelfSignedCertificate -DnsName $clusterName -CertStoreLocation "cert:\LocalMachine\My"
Write-Host $certificate.Thumbrpint
$password = ConvertTo-SecureString -String "SomeReallySecretPassword" -Force -AsPlainText
Export-PfxCertificate -Cert $certificate -FilePath "C:\path\to\certificate.pfx" -Password $password
[System.Convert]::ToBase64String([System.IO.File]::ReadAllBytes("C:\path\to\certificate.pfx"))
Let’s walk through what each of these commands does.
$clusterName = "my-cluster-name.centralus.cloudapp.azure.com"
This command is setting the fully qualified domain name for your azure service fabric cluster
$certificate = New-SelfSignedCertificate -DnsName $clusterName -CertStoreLocation "cert:\LocalMachine\My"
Next, we create a new self signed certificate that uses the cluster name. The certificate will be saved in the Local Machine certificate store.
Write-Host $certificate.Thumbrpint
Next, we print out the thumbprint to the console. We will need to add this thumbprint to our service fabric cluster in the Azure Portal.
$password = ConvertTo-SecureString -String "SomeReallySecretPassword" -Force -AsPlainText
Export-PfxCertificate -Cert $certificate -FilePath "C:\path\to\certificate.pfx" -Password $password
Now we need to create a pfx version of our certificate. To do this we need to create a password and then export the certificate to some place on our machine. Once you have your pipeline set up you can delete the pfx file.
[System.Convert]::ToBase64String([System.IO.File]::ReadAllBytes("C:\path\to\certificate.pfx"))
Finally, we need to create a Base64 string of the certificate. We’ll use this value in Azure DevOps as well.
Azure DevOps Connection
Now we need to plug this information into the Azure DevOps Service Fabric Connection dialog.
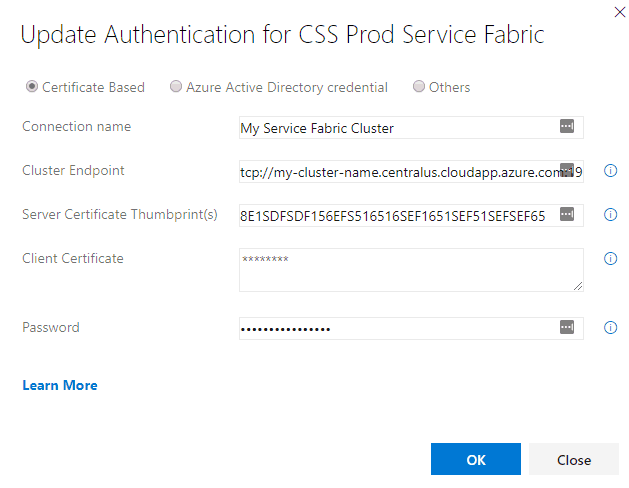
The Connection name can be whatever you want
The cluster endpoint is the same domain as we used when creating the certificate. The important things to remember here is that instead of using http you need to use tcp. Also, make sure you add port 19000 to the end (assuming your using the default service fabric settings).
The server certificate thumbprint is the value we obtained from the Azure portal at the beginning of this post.
The client certificate is the Base64 string we generated from our self signed certificate.
Finally, the password is the same one we used when creating the pfx file.
Congratulations, you should now have Azure DevOps connected to Azure Service Fabric!